Board Shape
Board Shape
refers to the geometry of the edge of your board and any internal cutouts. Most board shapes are rectangular but you can create more complex shapes. For example, you can create a circular board or a board with intricate cutouts.
You can set or change the overall size of your board. For example, you might want to increase the size of a board to allow room for adding more components.
To change the dimensions of a rectangular board:
You can create boards of custom shapes. For example, you might need to create a round board to fit into a round enclosure.
- From the left toolarb, turn on Snap To Angle mode.
- Drag the right edge of the board outline or select the edge and use the Left/Right arrow keys.
- Move the top edge similarly.
To create a custom circuit board shape:
You can create custom shape holes or cutouts in your board. For example you might need a square hole to fit around a heat sink.
- Choose the Selection tool.
- Select the existing board outline; press the Del key.
- Choose the Trace tool.
- On the Property Bar, select Board layer.
- Draw the desired board shape by drawing traces using straight lines, arcs and/or circles. When using the circle tool choose outline style, not filled. Close the shape. Avoid line intersections.
To draw a custom shaped hole or cutout:
- Follow steps 3, 4, and 5 above.
You can add an edge connector to your board (ex see the preview in the Job | Settings | Specifications dialog).
To add an edge connector:
- Use the Trace tool to draw the connector fingers, stopping at the board edge.
- Use the Polygon tool on the unMask layer to add a rectangle encompassing the fingers (to allow electrical contact).
- For gold plating check Job | Settings | Specifications | Advanced “Gold fingers or gold plating required”.
Changing the Origin
Pad2Pad specifies object locations in X,Y coordinates with origin at 0,0 at the lower left corner marked marked by a + symbol. You can move the Origin Point. For example, you might want to put the origin at the center of a mounting hole.
To move the Origin Point:
Origin Point coordinates are always shown relative to the current Origin Point position. On entering the Shift Origin Point dialog it always shows zero coordinates.
- Choose the Selection tool.
- Select the object to use as reference.
- Choose Edit | Origin Point | Shift Origin Point dialog appears.
- Specify the horizontal and vertical offset for the origin point.
- Click OK.
Board shape with round corners
Assume we need a board shape with 0.25″ rounded corners. Belows are steps of designing such a board shape.
-
- turn on the snap-to-line mode.
- On the attribute layer draw a horizontal 0.25″ line and snap the line end to the left top corner. Let’s call this line “helper line”:

- Double click the board line to the right of the helper line and delete the left part:

- Snap the board line to the helper line:

- Rotate the helper line 90 degrees and do the same for the left board line:

- Rotate the helper line 90 degrees and change its length to 0.5″:

- On the board layer draw an arc basing on the helper line:

- Delete the helper line, set the arc diameter to 0.5″, and adjust the arc begin/end positions to line up with the board lines.

Grids
A grid is an array of points spaced evenly horizontally and vertically. Grids make it easier to align objects in a uniform, professional layout. For example, you might want to place several pads precisely 0.1″ apart.
There are two types of grids:
- The Visible Grid is displayed on the workspace as a series of dots (0.1″ spacing by default).
- The Snap Grid usually has a smaller spacing than the Visible Grid and serves to automatically align objects when Snap to Grid mode is turned on.
To change grid settings:
You can also use multiple grids.
- Choose Edit | Preferences | Grids.
- Show Grid toggles grid visibility.
- Snap to Grid toggles on/off snapping to grid. You can also control this setting from the status bar.
- Spacing defines the distance between grid points.
- Grid Style defines the appearance of the visible grid.
- Grid Color specifies grid color.
- Presets allows you to save multiple grid options.
Multiple grids
You can configure, save and conveniently switch between multiple custom grids. For example you might want to setup and save a 0.1″ center grid for certain components and a .025″ grid for fine tuning trace positions.
To add a grid to the list of presets:
You can remove a grid setting.
- Choose Edit | Preferences | Grids.
- Enter the desired grid settings.
- Click ‘+‘ and enter a grid name.
- Click OK twice.
To remove a preset from the list:
- Choose Edit | Preferences | Grid.
- From the Presets drop list, select the grid to be removed.
- Click ‘-‘ | Yes | OK.
Undo and Redo
You can reverse the effect of the last change you made in your design.
- Click Edit | Undo as many times as desired.
To redo the last undone action:
You can undo or redo several actions simultaneously and you can review a list of actions done.
- Click Edit | Redo.
To undo or redo several actions at once or view the change history:
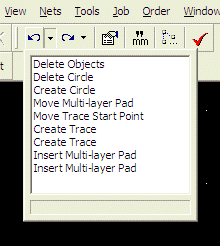
- Click the down arrow next to the Undo or Redo button.
- In the drop-down list select the commands to undo or redo or simply view the history.

Clipboard
The clipboard is a software feature that can store a temporary copy of part of your design. With the clipboard you can cut, copy and paste objects in your design. For example, you might want to copy and paste a section of your design to repeat it several times or copy it to another design file.
To copy an object onto the clipboard:
- Select the object and choose Edit | Copy.
To cut an object from your design and save it on the Clipboard:
- Select the object and choose Edit | Cut.
To paste an object from the clipboard into your design:
- Choose Edit | Paste. (You can paste multiple times if desired.)
Property Bar
The Property Bar displays information about the currently selected tool or object(s).
 With the property bar you can modify selected object(s). For example, you can move a selected object by setting its X and Y fields on the property bar.
To modify one or more objects:
Numeric fields allow to enter a simple arithmetic expression. You can also specify units of measure for a value/expression you enter:
mm for millimeters, “ or in for inches, and mil for 1/1000 of inch.
If a single object is selected, the Property Bar shows the parameters of that object. If multiple objects are selected, the Property Bar shows only the parameters common to the selected objects.
If the values of these parameters are different for any of the selected objects, the parameters will show as empty (however, you can enter values into such blank fields to set the values of all the selected objects).
The property bar also allows to specify settings of a selected tool. For example, you can set the default trace width for the trace tool.
- Select the object(s).
- Enter the desired values on the property bar.
To modify the behavior of a tool:
- Click in a blank area of the workspace so that no object is selected.
- Select the tool to modify (for example, the Trace tool).
- Enter the desired value on the property bar. This value will apply on the next use of the tool.
Grouping objects
A group of objects are several objects in your circuit layout that are linked together so as to behave like a single object when selected, dragged, or put onto the clipboard. All objects such as component footprints, pads, traces, 2D shapes, and text, can be grouped. For example, you might group several pads, a mounting hole, and a special shape to create a custom footprint or you might group a section of your layout to provide a convenient way to make several copies.
 button (it’s next to the coordinate fields) on the property bar, and enter the coordinates to move the insertion point to.
You can ungroup a group to split the group into it’s components. For example, you would need to ungroup the pads of a component prior to making a change to the footprint layout.
To group several objects:
To change the insertion (reference) point position, select the group or footprint, click - Select the objects to group.
- Choose Edit | Group or Make Footprint.
- Indicate whether to make a group or make a footprint. It is generally recommended to use the footprint choice when the group corresponds to a footprint since the footprint option includes the device in the parts list, allows for naming (e.g. R1, C1, etc), etc.
- Click OK.
To ungroup several grouped objects:
- Select the group or footprint.
- Choose Edit | Ungroup.
Aligning objects
Aligning elements on your printed circuit layout is the process of making the top, bottom, left or right edges of multiple objects all fall in line. For example, you might want to align several pads to have their centers positioned on the same vertical or horizontal line.
To align objects:
You can align objects by Reference Points or by Edges by enabling the Edit | Align | By Reference Points or Edit | Align | By Edges options. If you choose to align by reference points, the objects will be aligned by their reference points – usually their centers. If you prefer to align by Edges, the objects will be aligned by their Left, Right, Top or Bottom edge.
- Select the objects.
- Choose Edit | Align and select the alignment (Left, Right, Top or Bottom).
Distributing objects
Distributing objects is the process of arranging the objects with uniform spacing. For example, you might rearrange several pads to have even spaces between them.
To distribute objects:
You can arrange the objects either by Reference Points or by Edges by enabling the Edit | Distribute | By Reference Points or Edit | Distribute | By Edges options. If you choose to distribute by Reference Points, the objects will be distributed by their reference points – usually their centers. If you prefer to distribute by Edges, the objects will be distributed by their edges.
- Select the objects.
- Choose Edit | Distribute.
- Select the Horizontally or Vertically.
Snap
The snap features allow you to quickly and accurately place pads and traces on a grid or at a specific angle.
To configure Pad2Pad to snap pads and trace ends to the grid enable the Snap-to-grid button on the left toolbar.
To configure Pad2Pad to constrain traces to 45 degree and 90 degree angles enable the Snap-to-angle button on the left toolbar.
To configure Pad2Pad to snap pads, circles, arcs, trace ends to other objects at their key points enable the Snap-to-line button on the left toolbar. Please note that objects of any layer except the attribute layer can only snap to objects of the same layer, objects of the attribute layer can snap to objects of any layer and vice versa.
